
Something I hadn’t considered before it came up at work was that it might be useful to sometimes have areas of varying transparency in a single live paint group. Live paint is a useful shortcut in Illustrator that people probably take for granted now, but it was probably originally a way of making things in Illustrator a bit more Photoshop-like for newcomers. Before live paint, you’d probably construct everything you needed to fill as a closed path, which makes a bit of planning and close attention to the stacking order of objects essential for complex drawing. With live paint, you can just draw and let those things take care of themselves for the most part. Read up here if you’re unfamiliar.
Anyway, one thing you can’t do without breaking your live paint group into separate closed paths is adjust the transparency of individual filled areas. Not in the usual way, at least. You can still select individual paths (and the fills themselves with the live paint selection tool), but if you look at the appearance panel you’ll find you still just have the live paint group selected — there’s no way to add a stroke to an individual path either. Take this giant butterfly:

He’s a live paint group, of course. Say I wanted his colourful wing segments to appear transparent, but the dark areas to remain opaque. The first clue as to how you can go about this is here:

You can fill a live paint group with anything in the swatches panel, including patterns and gradients. Patterns can be transparent! In fact, if you make a transparent filled object and drag it to swatches, a pattern swatch is what you get:

It’s just colour; it’s only attribute as a pattern is that it has 50% opacity. So naturally, you create a set and colour away with the live paint bucket.

Looks delightful! However, there’s one pitfall I’ve found of this method. It’s quite a niche situation, but could be critical if you fall into that tiny niche and can’t figure out what’s wrong. Say you wanted to add a stroke around your butterfly. You’d add it in the appearance panel, drag it below the live paint contents so it doesn’t visually cover the whole group, and then set knockout group so it doesn’t show through the transparent areas (read more about the very useful option knockout group here).

Pretty silly, but that’s what you want for some reason. Looks fine in Illustrator, but you’ll get a hint as to what’s wrong with this if you check a preview of it in Bridge or your OS:
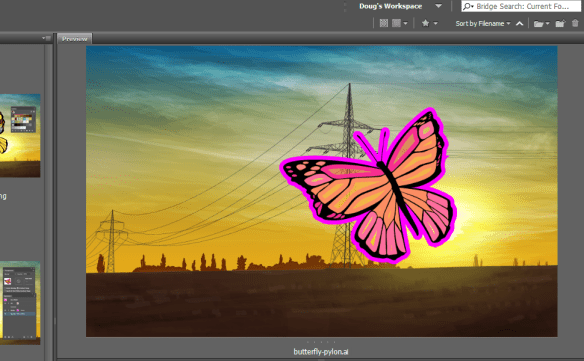
You can see the stroke through the transparent areas! Knockout group should prevent this, but for some reason it doesn’t. You’ll see the same thing if you place the AI file in InDesign, or if you export a raster file such as PNG. This is because other applications can only view the PDF side of the AI file, and while this method works fine in Illustrator, something evidently gets lost in the translation to PDF. This isn’t great news if you actually need to produce something using this method!
Fortunately, there’s another way. Remember that you can add gradients to the swatch panel too, and these can also contain transparency. Obviously you could have any combination of transparent gradient stops, but if you just want to replicate what we’ve made above, you’d need a gradient with two identical stops, with the same opacity setting.

A bit of a pain, and rather odd, But for whatever reason, this setup translates fine into the PDF, and makes an image created in this way usable elsewhere.
